Welcome to Fueler Plus, the basics and beyond. My name is David Katz, and I wanna show how Fueler Plus can greatly improve your fuel tracking process and equipment fuel cost analytics.
We are going to cover how fuel transactions can be tracked from field entry to imports, in addition to walk through some of the system configuration and usage.
Afterwards, we will review the popular reports and exports that should summarize how valuable having this process can be to getting quality fuel cost data.
Before we dive into the software, consider how you are currently tracking fuel.
Do we record fuel transactions? And if so, are we still on paper?
If you have a fuel card system or third party fuel report and you also have paper transactions, how do they compare in terms of ease of management and quality of data?
Next, let's consider why we even track fuel.
Generally, I see equipment fuel consumption being used as a part of the equipment's rate for estimating.
Fuel cost can even be used to track job costs more accurately.
Fueler Plus can also help identify potential theft by comparing between actual tank levels and Fueler Plus tank levels.
In some jurisdictions, there are even fuel reporting requirements that Fueler Plus tracks as a part of the standard process.
One of the key parts of the Fueler Plus system that ensures accuracy is recording all fuel purchases, whether from a third party service, fuel delivery, individual purchases, or all of the above. Fueler Plus can easily track purchases from all of these methods with the right data.
Let's take a look at the different options to track fuel dispenses.
The most popular option is the Fueler Plus mobile app, which acts as a time card for a fueler and easily lets them record fluid dispenses, meter readings, and locations for equipment.
Even fluid transfers between containers can be tracked from any up to date iPhone or Android device.
Another cool option is giving Foreman the ability to track fuel transactions from any container, such as an on job fuel tank. For our foreman already using heavy job mobile, they can quickly record fuel transactions for equipment on their time card.
The Fueler Plus manager system is a desktop PC application that can not only enter transactions, but can also import fuel data, review time cards, report on fuel, and complete any necessary Fueler Plus setup.
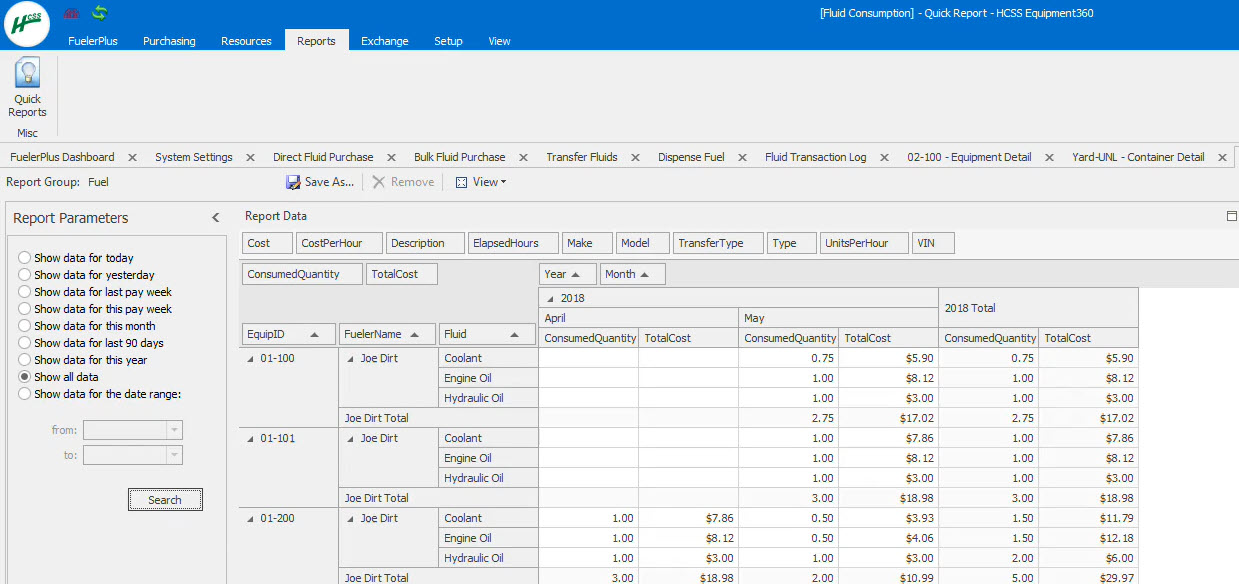
Some popular exports include the equipment fuel report, which can generate fuel costs per equipment that can then be used to send to accounting.
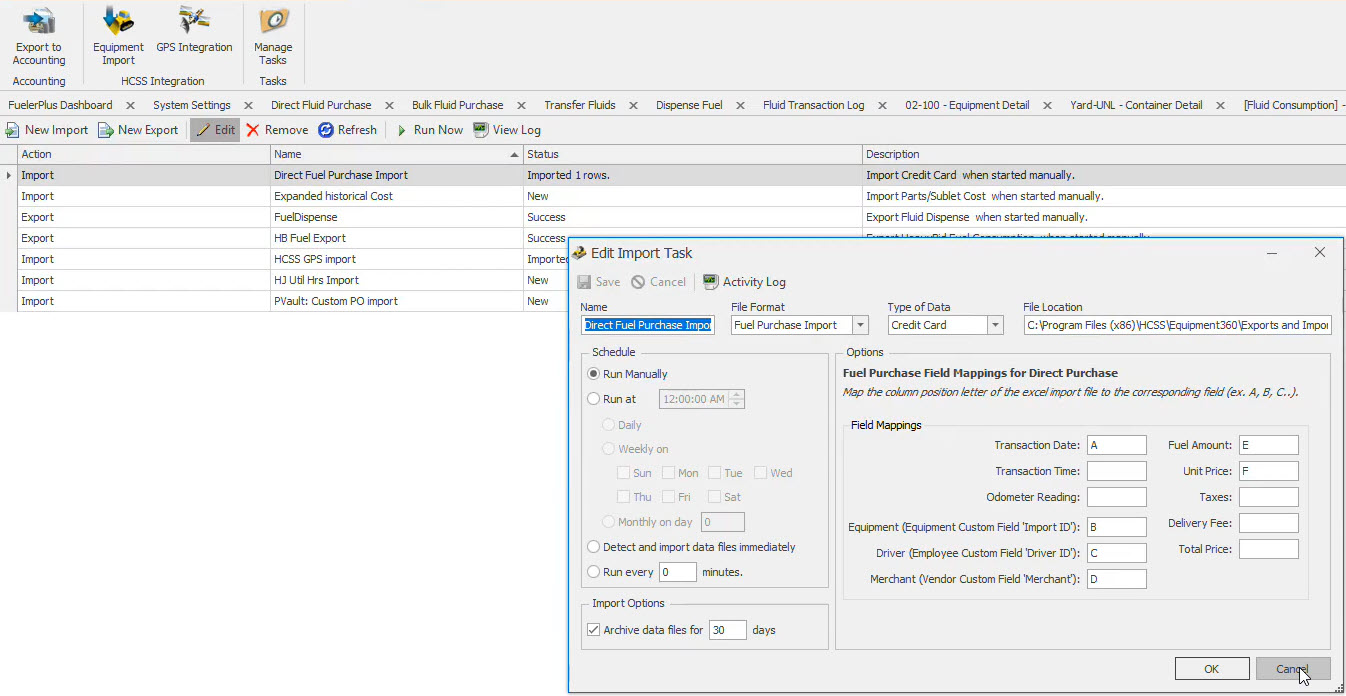
In addition, the fuel transaction import can be used to import fuel transactions from an Excel file.
Popular systems that are used to import fuel transactions from include Fuelman, Phoenix, and Gasboy. WEX and other fuel vendors provide fuel transaction logs that can be imported into the system as well.
Finally, Fueler Plus can integrate with HeavyBid to export fuel data for bids and Equipment three sixty to gather meter readings for preventative maintenance.
Let's take a dive into the Fueler Plus software with a day in the life of a fueler using the mobile app.
Feel free to follow along by downloading the app and entering a server URL of demo at h c s s dot com.
The mobile app can be downloaded from the Apple App Store for an iPhone or iPad or the Google Play Store for Android devices.
Once connected and configured, the first screen you should see is the main screen. As a fueler, the first thing we need to figure out is the current fuel level in our tank, which can be set in my containers.
Next, tap the set totalizers, and then enter the current fuel meter reading on all of the tanks attached to the truck.
Save and then return to the main screen by hitting back.
Afterwards, we need to select which jobs or locations we are going to today in my route.
From here, tap edit route and check off the locations you are going to be fueling at and click done.
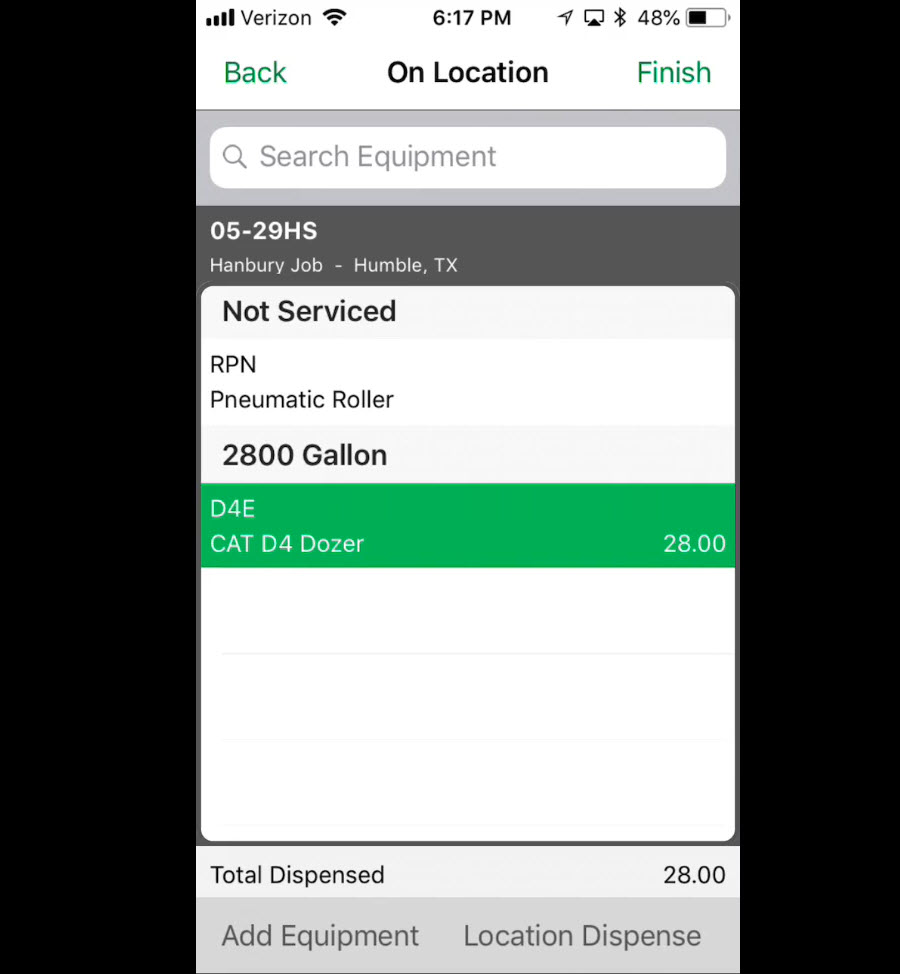
Things are very easy from here. Simply tap at the job you are on, and you will be shown all the equipment at that location.
From there, fueling a piece of equipment is as simple as tapping on it and selecting fuel equipment.
We are then brought to a screen where we can select our fuel truck's tank, dispense a quantity, and enter a meter reading.
Tap done when complete to be brought back to the list of equipment at this location.
As we continue our day in the life of a fueler, keep in mind if you don't see a piece of equipment in the list, you can simply click add equipment at the bottom to choose from anything in the fleet.
For any small tools or equipment that don't appear in the list, perform a location dispense to indicate quantity dispensed and a note of where it was dispensed.
In addition, add the equipment ID or unit that was dispensed into.
Note, there are a couple of options when you tap on a piece of equipment.
For example, not here will remove that piece of equipment from the jobs list.
No work will push the piece of equipment to the bottom of the list with fueled equipment to help process all equipment at the job.
Once finished with fueling at a job, we can click back to choose another job or click back again to return to the main screen.
From the main screen, navigate to the time card, select the date, and tap create new time card.
From here, we will ensure our name appears in gray, then tap to enter work.
To build our time card, we must select the job we worked on, the type of work we performed, and the start and end time.
Finally, tap save to be returned to the time card where we can enter additional work or tap finish to complete the time card.
Note, there is a feature that will automatically clock you in on your time card that can be activated in settings.
Return to the main screen where we will now fill up our fuel truck from the yard tank and record it in transfer fluids.
Select the yard tank we are taking fuel from and the fuel container that we are dispensing to.
Then enter an amount.
Tap done and select an option from the prompt.
When done for the day, it is vital to send data or else none of your fuel dispenses or time cards will be saved.
Tap send data to review fuel transactions against the totalizer or current fuel meter.
Tapping the selected tank will allow you to select a different tank to review transactions for.
When finished, ensure we have a connection to the Internet and tap send.
From fuel transactions to time cards and even error checking, the Fueler Plus mobile app makes it very easy for a fueler to track his daily work and reduces error by providing error checking and eliminating duplicate entry.
Next, let's walk through some of the recommended setup for Fueler Plus by logging into the manager system.
Be sure to select the Fueler Plus manager license when logging in.
The first thing to set up is gonna be user accounts, but first, each user account requires an employee record. Navigate to the setup menu, employee, then employees.
Add new employees to the list by clicking in the top row where it says click here to start a new row and filling out the code and name fields. If you are setting up a user account for a fueler using the mobile app or just to record their transactions, be sure to assign them a pay class and the fueler type, then click save.
Next, navigate to security and user accounts on the menu tree on the left.
Then click new to select the employee, their login name, and password.
Be sure to select administrator for users who have full access, fueler manager for users who have nearly full access, and fueler field for any users who will be using the fueler mobile app.
Next, we will continue the fueler setup by first navigating to unit of measure under fueler setup.
We will set up any units of measure pertaining to dispensing fluid, such as gallon.
Second, we will navigate to fluids where we'll set up the different types of fluid we want to track such as on road diesel, unleaded, and engine oil.
Make sure to check off is fuel to make fuel transactions easier to track.
Third, navigate to containers where we will set up any holding tank we use to transfer or dispense fluid from.
Most commonly used containers include the tank on the back of a fuel truck, yard tanks, and job tanks.
Be sure to populate as much detail as possible such as capacity, but leave the quantity blank or zero.
To attach a container to a fuel truck, be sure to check the fuel truck checkbox in the equipment detail.
Before we wrap up the Fueler Plus setup, don't forget to attach a fueler to his fuel truck in the fuelers option on the left menu tree.
Now let's review some of the basics about the Fueler Plus manager system.
First, we will talk about fuel transactions and how we can keep them separated in the system.
Fueler Plus has four types of transactions. When we fill a piece of equipment or a burn tank, we call this dispense fuel.
When we move fuel between containers, such as from a yard tank to a fuel truck tank, we call this transfer fluids.
When we purchase fuel for one of our containers or holding tanks, we call this a bulk fluid purchase.
The final type of transaction is a direct fluid purchase, which is when we purchase fuel directly from a vendor into a piece of equipment's burn tank.
If you notice in the fueler plus menu, you will see all these types of transactions listed out.
Navigate to the direct fluid purchase in the fueler plus menu.
Enter at least the required fields to save a transaction of a vehicle or piece of equipment being fueled directly by a vendor.
Generally, this data is imported using the fuel transaction import using a file generated by your fuel vendor. However, this screen provides an option of creating and reviewing direct fluid purchases.
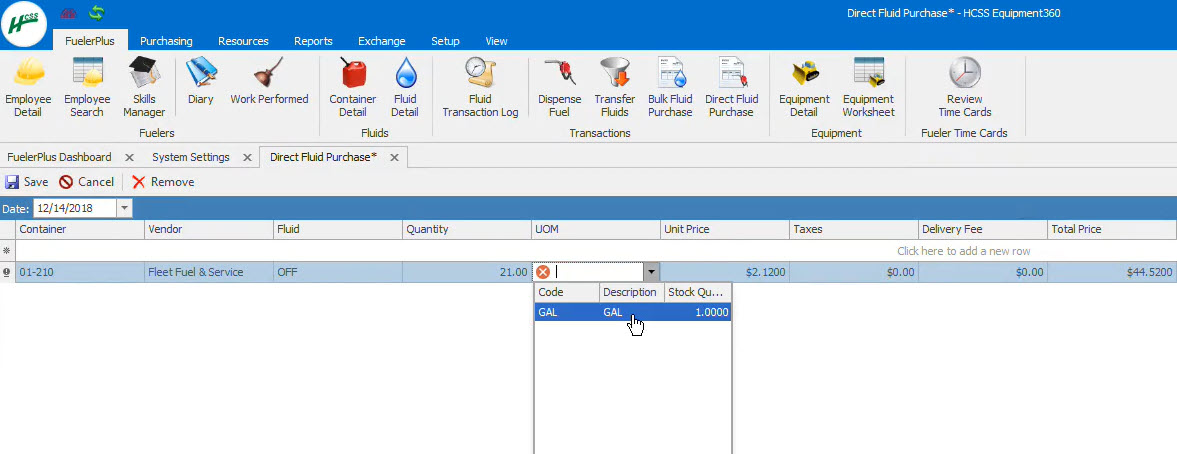
Navigate to the bulk fluid purchase so that we can fill up our yard tank.
To create a new bulk fluid purchase, ensure the date is set to the purchase date and click where it says click here to add a new row.
Enter in the container we are filling up, the vendor we purchased from, the quantity of fuel purchased, the price of the fuel purchased, who purchased the fuel, and any other information you wish to track.
These bulk fluid purchases are vital to ensuring proper fuel costing in the system, so be sure to enter in an accurate price and quantity.
Next, navigate to the transfer fluids in the Fueler Plus menu and select the date of the transfer.
The required fields that need to be entered will be who transferred the fuel, what container the fuel came from, what container the fuel went to, and the quantity.
One of the most common transactions is found in dispense fuel where a container is used to fuel a vehicle or piece of equipment.
Although transfer fluids and dispense fuel are generally only done by the fueler in the mobile system, these screens offer a way for managers to enter or review transactions.
As transactions continue to get entered in the Fueler Plus system, it is highly recommended for a manager to review the fluid transaction log as it is one of the most powerful fuel reports in the system.
It's a customizable report that can show every fluid transaction from purchases to transfers to dispenses.
When running the report, be sure to adjust the filters on the left pane as desired and click search.
For other fuel data, check the history tab of the equipment or container detail for transactions tied to that equipment or container.
In addition, check out the assortment of customizable reports for fluids in the reports menu and quick reports.
When ready to review fueler time cards, navigate to the fueler plus dashboard or click the purple meter in the quick launch icons.
The dashboard displays a list of pending time cards that need to be approved before they can be exported to the accounting system.
Simply double click a pending time card to be brought to the review time card screen.
To approve a time card, click the approve time button.
If any changes need to be made, it is recommended to adjust the line items of the time card until the times or duration are accurate.
The basics we have covered will be perfect to get started in the system, but don't forget about the valuable integrations.
There is a Fueler Plus export to HeavyBid that will supply equipment fuel costs.
To import fuel purchases or other transactions, there are a few options in the form of a managed task, which will take data from an Excel spreadsheet and import it into Fueler Plus.
As for the payroll export, the fueler's approved time can be customized to export to a flat file, then imported into nearly any capable accounting system.
We hope you've enjoyed this class. And if you have any questions regarding our software or training, please reach out to our professional services team at seven one three two seven zero four thousand, or email us at training at www.hcss.com.